Patient Radiation Safety in CT: What You Need To Know

Patient Radiation Safety in CT - What You Need to Know

In this week’s video, Eric from Olympic Health Physics explains the 10 pearls of radiation protection of patients in CT, as recommended by the IAEA (International Atomic Energy Agency) for the Radiation Protection of Patients (RPOP).  This help will give some guidance on the best ways that we can employ to protect our patients when using computed tomography imaging. 

1. Perform The Scan Only If It's Indicated

Try to avoid any unnecessary exams.

Remember that the lowest radiation exposure to a patient is the radiation exposure that doesn’t occur. This is why it’s important to know that if there’s an exam that shouldn’t be performed, then we shouldn’t be scanning the patient.

2. Consider The Use of Alternative Imaging Options

You can use alternative modalities to potentially answer the same clinical question.

Ultrasound or MRI don’t use radiation and they could be alternatives depending on the diagnostic question that’s trying to be answered. If a patient can be imaged using ultrasound or MSI from a radiation dose perspective, then it can be an excellent option when those modalities are appropriate.

3. Always Check If Your Patient May Be Pregnant​

We don’t want to unknowingly image or do a CT on someone who is either pregnant or potentially pregnant. That’s the reason why you always need to verify the patient, whether or not they could be pregnant before doing their exam.

You can do this by having postings in the department that say, “Please notify the technologist if there’s a possibility that you’re pregnant”. Another option is to directly ask the patient if there’s any possibility that they could be pregnant.

4. Start Using Images With Some Noise Without The Loss of Diagnostic Information

Always check if your patient may be pregnant.

It’s important to know that high-quality, detailed, and crisp images look really nice, but they may not be necessary for answering the diagnostic question.

You could potentially use a lower radiation dose and still answer the diagnostic question. The trade-off is that we’re going to introduce some noise and potentially lose some image quality. However, that loss and image quality are not going to necessarily change the diagnosis or the outcome for the patient.

We want to make sure that you’re using the right radiation dose for answering the clinical question.

5. Use Indication-Specific CT Protocols For Each Body Part

We want to use indication-specific protocols where they’re applicable. For example, not every chest CT should be a full chest image. We could do a low-dose screening, a lung screening chest protocol, and also potentially do a low-dose nodule follow-up protocol.

We want to use very specific protocols for the type of exam that we’re trying to do. The reason is that oftentimes those very specific protocols can be acquired at a lower radiation dose to the patient.

6. Multiple Pass or Multiphase CT Should Not Be Performed Routinely

It’s important to know that multiple pass or multiphase CT should not be performed routinely. We want to try to limit the amount of passes that we make through the patient. Only do the passes that are actually necessary and potentially combine different protocols.

This is why multiphase CT studies can often be 2 to 3 times the amount of radiation dose as just a regular CT.

7. Adjust Exposure Parameters According To The Patient And Body Part

We want to adjust the technique that we’re using to image our patient for the actual patient size. First, we want to take into account the size of the patient and the exam. Then, adjust any technique that we’re using so  it’s specific to the patient and the body part that we’re imaging.

The reason for this is to get away from a one size fits all technique and move to very patient-specific techniques. That way, smaller patients receive lower radiation doses than larger patients.

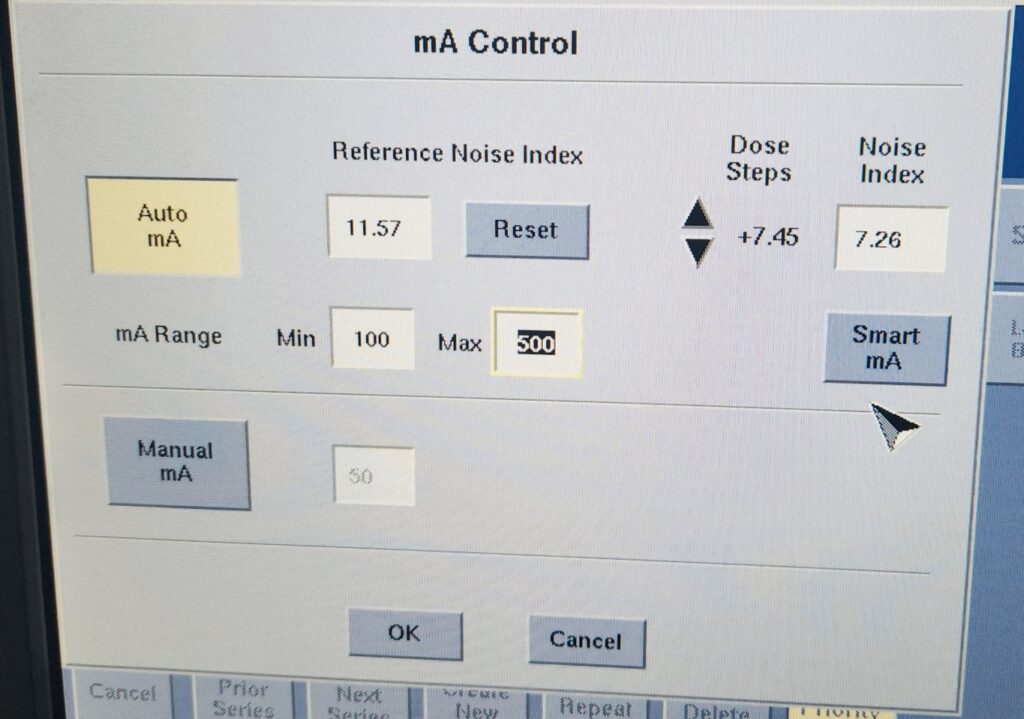
8. Know Your Equipment, Including the AEC System

Another important aspect is to know your equipment. For example, understand how the AEC (Automatic Exposure Control) works or the tube current modulations and how that works for your system. 

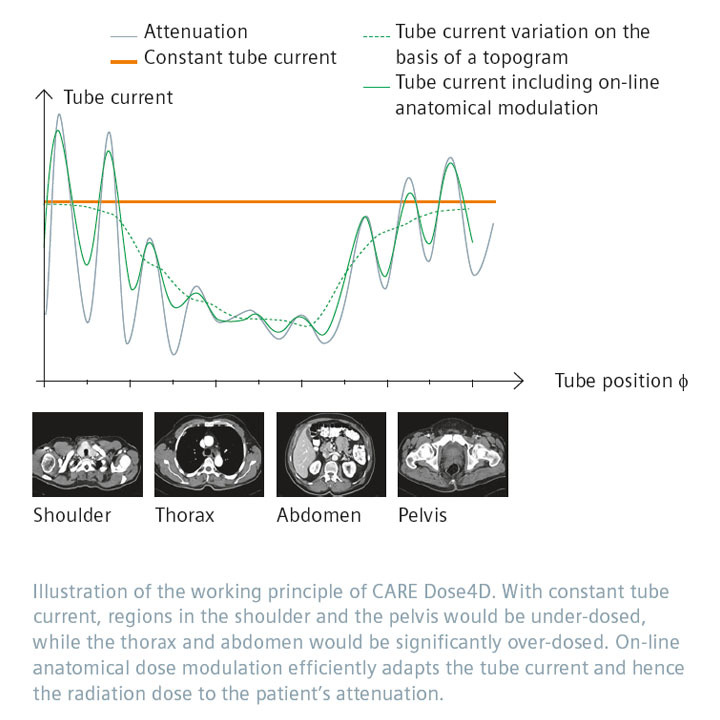
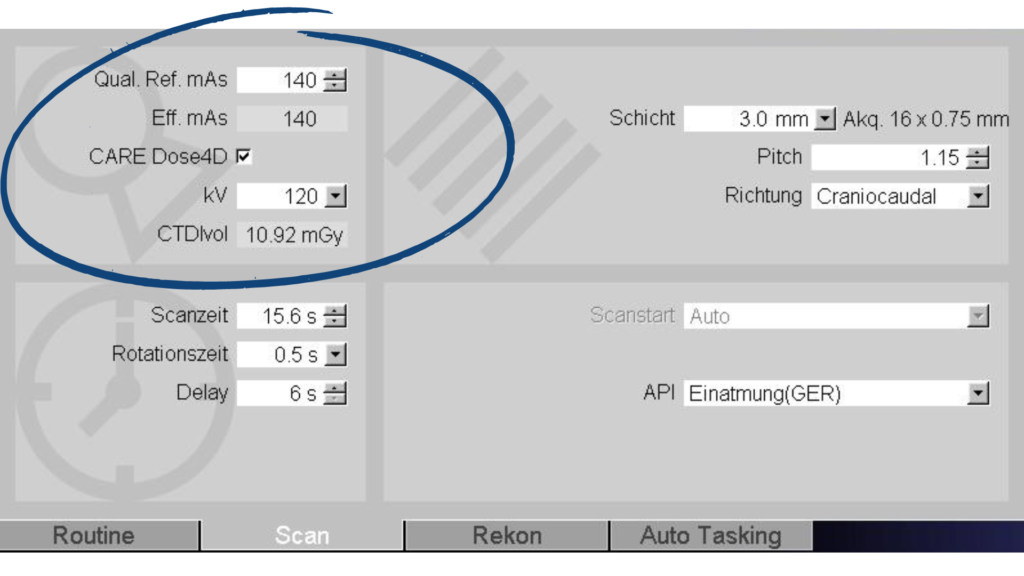
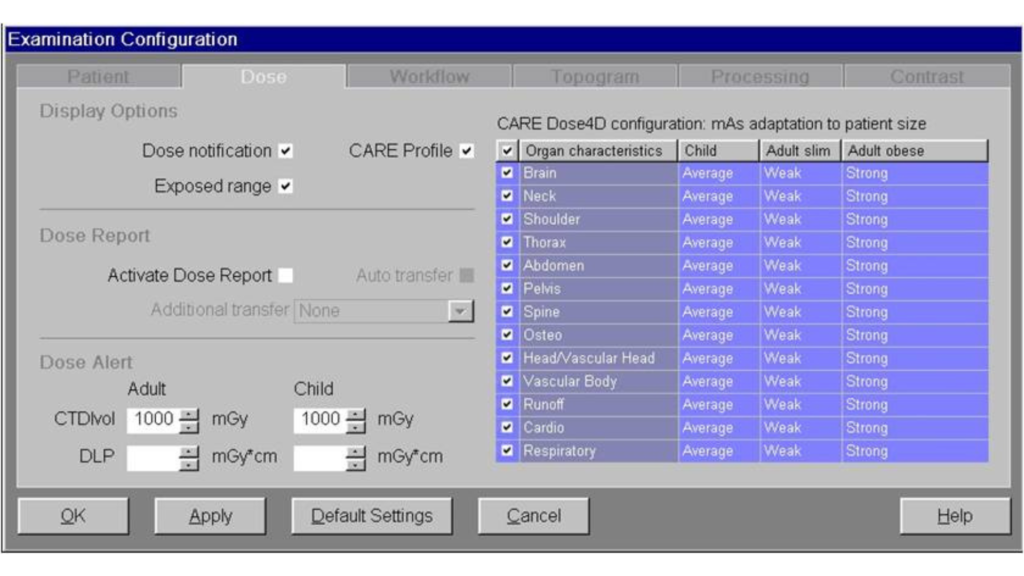
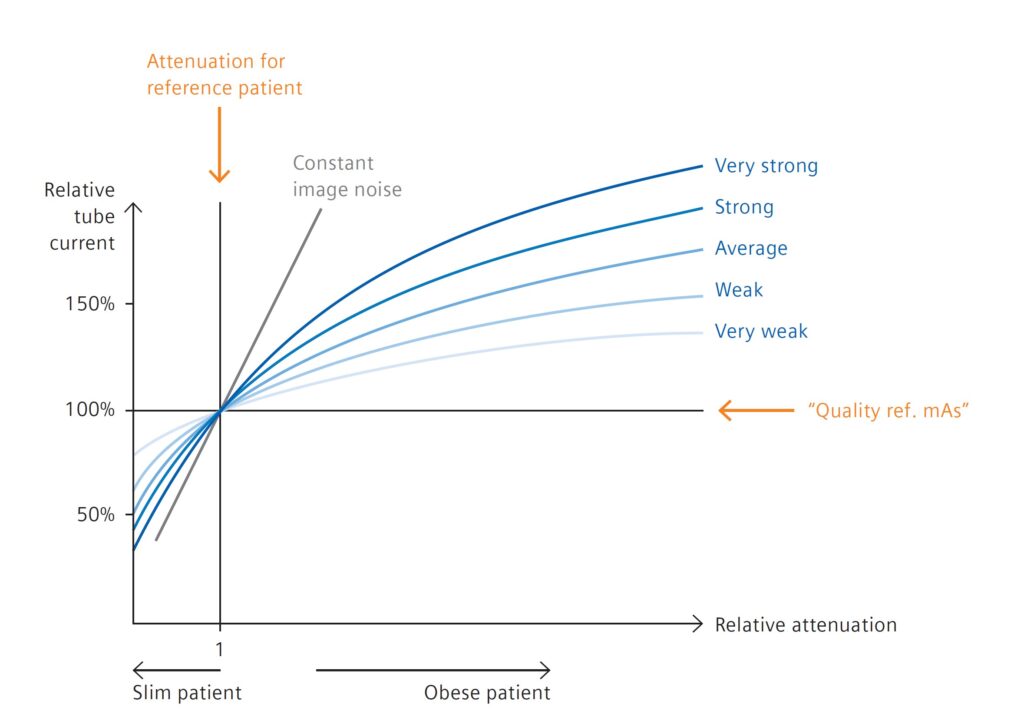
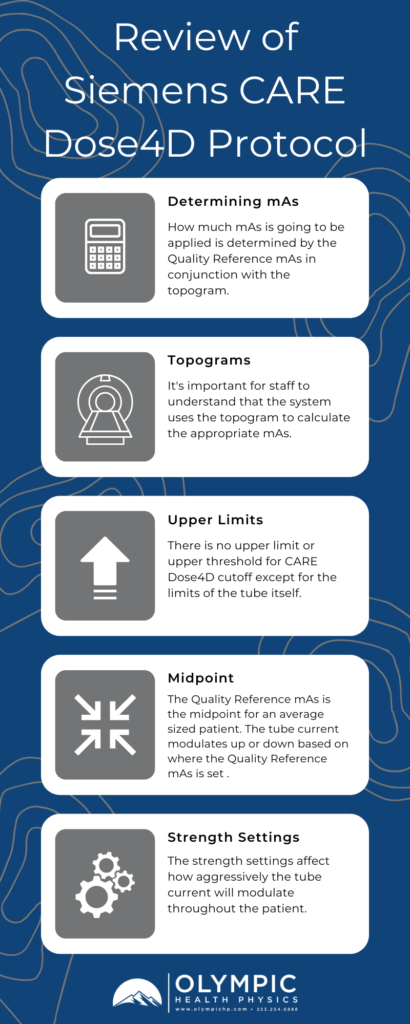
How Does CARE Dose 4D Work?

If you’re scanning on a Siemens scanner, make sure you understand CARE Dose4D. And if you’re scanning on a GE scanner, make sure you know how AutomA works. This way you can use the scanner to the best of its ability and it will help you give the right radiation dose to your patient.

To learn more about the Siemens CARE Dose4D system, check out our previous post here. And for information on the GE AutomA system, you can find our latest post here

9. Use Good Technique

Use good technique when we’re talking about good technique. These are things like:

•  Making sure that your patient is iso-centered within the gantry. This is in both the lateral direction as well as the AP direction.

•  Confirm that the patient is iso-centered, particularly while using tube current modulation.

• Check that your scan length is covering only the anatomy that’s absolutely necessary. We don’t want to scan the diagnostic portion of the CT.

The one caveat to this is with a scout. When using a scout, it’s better to use a little bit longer of a scout than what you intend to cover with your diagnostic scan. Keep in mind that he diagnostic scan should be shorter than your scout.

10. Pay Attention To Radiation Dose Values

Don’t forget to pay attention to your radiation dose values, such as the pre-scan CT because you need to make sure that you’re falling within your pre-determined dose values and dose limits.

Click the image above to download the file

Review the doses that you’re using on a monthly basis to see if there are any adjustments that you can make. Consider things like your protocols, your techniques, and how you’re scanning patients. From this information, you can have a pretty good idea of what your doses should actually be, what they have been and what they should be for the equipment that you’re using as well as for what your radiologists are accustomed to looking at.

Now you know that there are ten different ways to protect your patients, reduce their radiation dose and make sure that they’re getting the right radiation dose for the type of exam that’s been ordered.

Click here to download your copy of the IAEA’s 10 Pearls of Radiation Protection of Patients in CT.

Our team is dedicated to ensuring that your facilities’ radiation safety program functions in accordance to regulatory standards, sound radiation safety principles, and most importantly serves to protect staff, patients, and the general public from the hazards associated with ionizing radiation. To this end, Olympic Health Physics can provide a physicist to your organization to fulfill the Duties of the Radiation Safety Officer. To learn more, check out our RSO Services or click the link below. 

Contact Us for a No Obligation Quote

253-254-6988

How Does AutomA Work?

How Does AutomA Work?

In this post, we’re going to be talking about AutomA, what it is and how to use it.

Whether you have a GE CT Scanner or you’re interested in getting a GE CT Scanner, we will provide you with an overview of what AutomA is all about.  

Watch the video above on our YouTube channel as Eric walks you through exactly what AutomA and SmartmA are and uncovers some of the mystery surrounding these GE CT Scanner options.

Before we get too, it’s important to understand that this post uses the terms AutomA and SmartmA interchangeably to mean GE’s version of automated exposure control or tube current modulation. They are somewhat different and we’re going to talk about the differences.

What is AutomA?

When we’re using AutomA, we’re using a GE version of tube current modulation.

With AutomA, we’re able to modulate the dose in the Z axis. As we scan a patient from head to toe, the tube current is going to modulate based on the size, shape and density of the material that you’re going through. For example, if you’re scanning through the chest, we may be able to use a lower mA, whereas if we’re scanning through the abdomen and pelvis, we may need to use a higher mA. AutomA is going to automatically adjust the amount of mA that’s used as you’re scanning from the chest into the abdomen.

What is SmartmA?

Smart AutomA is a rotational RMA, allowing the scanner to change the mA in the X and Y planes. As the tube rotates around the patient, the mA is going to modulate up and down based on whether or not there’s more anatomy to penetrate and the anterior projection versus the lateral projection. To summarize, AutomA is only in the Z direction. So it’s a limited version of tube current modulation, whereas if you turn on SmartmA you get modulation in all three planes, the X, Y and Z plane. With either of these features enabled, it’s important for you to ISO center the patient.

What is the Importance of IsoCentering Your Patient?

When using either AutomA or SmartmA, it’s important for you to isocenter the patient. Isocentering the patient is important because you want to have an accurate sizeshape model. AutomA is going to use your scout as well as the noise index to calculate how much mA the scanner should use as it scans through the patient.  

What is Noise Index?

Before we discuss noise index, let’s talk a little bit about noise. Noise is going to be inversely related to the number of xrays. We can think of xrays and mA as being equivalent to each other. As a result, when we increase our mA or we produce more xrays, we’re going to decrease the amount of noise in our image. This creates better images.

The opposite is also true. If we decrease the amount of xrays or decrease our mA, we will increase the noise and create noisier images. The noise index is going to approximately equal the noise or the standard deviation in the central region of an image using a standard or uniform phantom. With your patient images, you can draw a region of interest in the center of the image and the noise index or the standard deviation should closely mimic your noise index that was set for the scan. 

What is the Importance of Noise Index Values?

The other detail to know about AutomA or SmartmA is that the noise index value is going to be set for the first perspective reconstructed image series. You want to set your noise index values understanding the thickness of the first reconstructed slice. If it’s 2.5 millimeters or 5 millimeters, you’re going to want to set that noise index based on the slice thickness. For example, if you have a noise index of ten and the first reconstructed image series is a 5 millimeter, then your noise index or the standard deviation in that five millimeter slice should be close to ten. But if your first reconstructed image is 0.625, then AutomA is going to use a lot more mA to account for the loss of data in the thinner slices. 

The GE CT Scanner Panel for mA Control

Let’s take a look at what this actually looks like on a GE scanner. On the scanner panel photo below, we can see that AutomA is turned on and SmartmA is not turned on. If you want to turn on SmartmA, you just click the button to turn it on. The panel also shows the reference noise index as well as the noise index. 

The Reference Noise Index is the default noise index for a given protocol, whereas the Noise Index is the noise index that’s going to be applied for that specific scan or patient.

We also have dose steps. The dose steps will increase or decrease the noise index by about 5% and then have an opposite effect of about 10% on the mA. You can click either of these buttons, the up or down on the dose steps and see how it changes the noise index compared to the reference noise index.

You’ll also note on here that you have an mA range with a minimum and a maximum. The great thing that GE does is apply that maximum mA so that you know you’ll never exceed a particular CTDI or radiation dose for a given patient.

You do want to pay attention to the mA that is given to the patient or the resultant KTVI whenever you’re doing dose reviews to make sure that you’re not maxing out this mA on every single patient. One challenge we see quite frequently is when AutomA is being used, every patient gets the maximum dose. 

You can turn on the Manual mA and enter in the value of the mA that you want to apply for the scan and that will turn off both AutomA and SmartmA. GE does have some newer versions of software and while they look different, all the metrics are called the same and they work in the same way. You can take these concepts here and  apply that them to the newer versions of software.

Conclusion

This pretty much covers the basics of AutomA and SmartmA, what noise index means, how noise index works, how to set your mA range and how to use AutomA and SmartmA to benefit your patients. This can ensure they’re receiving the correct radiation dose. This also helps you to produce consistent image quality from patient to patient and providing quality care to your patients.

If you have questions about AutomA, SmartmA, or how tube current modulation works for GE scanners, feel free to send us a note, drop us a comment and let us know how we can help you. 

Ensuring your equipment is operating properly through an annual CT Physics Evaluation may be the best first step in providing a safe environment for your patients. Our CT Physics Evaluations are designed to be compliant with ACR, TJC, IAC, and State requirements for accreditation and compliance purposes.   You can also always reach out to us if you have questions or want more information on why you should partner with us. 

Contact Us for a No Obligation Quote

253-254-6988

How Does CARE Dose4D Work?

How Does CARE Dose4D Work?

In this post, we’re going to be talking about CARE Dose4D, what it is and how to use it.

Whether you have a Siemens CT Scanner or you’re interested in getting a Siemens CT Scanner, we will provide you with an overview of what CARE Dose4D is all about.  

Watch the video above on our YouTube channel as Eric walks you through exactly what CARE Dose4D is and uncovers some of the mystery surrounding CARE Dose4D.

What is CARE Dose4D?

CARE Dose4D is the Siemens version of Tube Current Modulation or Automated Exposure Control. It’s a way for the scanner to predict what the correct tube current output, the mAs, should be in any given position of the scan. 

What is Tube Current Modulation?

The concept with tube current modulation is that as we image larger patients or go through thicker parts of the body we’ll increase the tube current, or mAs, to account for the additional tissue or body that we need to penetrate. As we go through smaller or thinner sections of the body, we can decrease the radiation dose.  

What are the benefits of using CARE Dose4D?

Benefit 1: Ideal Radiation Dose

The first benefits of using CARE Dose4D or other automated exposure control options is that the radiation dose delivered to the patient is going to be the most appropriate dose for that patient. 

Benefit 2: Consistent Image Quality

The second benefit of the Siemens CARE Dose4D option is that we can create consistent image quality within the patient and from patient to patient. For example, if we have an adult abdomen protocol that we’re using, we want to make sure that we have consistent images for 100lbs patients as well as 300lbs patients and everything in between.

We want to create consistent image quality and CARE Dose4D is a tool that helps us do that.  

An Illustration of How CARE Dose4D Works

To the left, we have a graphic showing how CARE Dose4D works.

As we scan through the body, the tube current is going to modulate in the X and Y position. The modulation is represented by the peaks and valleys that we see in the illustration.

As an example, as we go through an anterior projection of a patient, we may use more mAs and as we go through a lateral projection, we may use less mAs.

The tube current can actually increase and decrease as the tube is going around the patient.

In addition to that, we also have modulation in the Z direction or the Z axis, when we’re scanning through the patient. As a result, we might use more mAs going through the abdomen and pelvis than we would through the chest, for example. 

How Do We Use CARE Dose4D?

When using CARE Dose4D, we need two different parameters in order for the system to be able to calculate what the mAs should be as we scan through the patient. Those two parameters are: 

  1. The image quality reference parameter, which for Siemens is called the quality reference mAs.
  2. The other thing that we need is the scout or topogram.

How the dose is going to modulate through the patient is based on the topogram and the set point of the quality reference mAs.

How is a Topogram Used for CARE Dose4D?

A topogram is used to allow the system to calculate the size-shape model of the patient to determine how big is the patient. Depending on the software version on your CT scanner, that’s going to change how the topogram is used. Older versions of Siemens software use two topograms to calculate the size-shape model. Newer versions use only one topogram, so be aware that the topogram can be used differently in these calculations based on the software version that you have. However, the concept is going to remain the same. 

What is Quality Reference mAs?

The quality reference mAs is the mAs that we would give to a patient if we were to use a fixed technique for an average sized patient. CARE Dose4D defines an average sized patient as 75 kilogram.

CARE Dose4D is going to modulate up and down based on that midpoint. What you should be doing when you set your quality reference mAs is to set it for the mAs that you would give to an average patient for that specific protocol.

In the above screenshot from a Siemens CT scanner, you can see where we enter the quality reference mAs value. We have our CARE Dose4D turned on and our quality reference mAs is set at 140. Based on that setting of 140, it’s going to give you a prescan CTDI.

That prescan CTDI is going to change for each patient after you perform their scout. The system is going to give you a different value specific to that patient based on what your quality reference mAs is set at.

Once you set your quality reference mAs for the protocol, it should not be routinely changed. This number should stay consistent from patient to patient because the whole point of CARE Dose4D is to modulate the dose up and down based on the attenuation that is seen in the scout for the patient.  

An Important Reminder on Patient Positioning

When you’re doing your scout, you want to make sure that you isocenter your patient, getting them right in the center of the gantry as best as you possibly can, because that’s going to affect the size-shape model of the patient.

For example, let’s say you’re doing an AP topogram. If you have the patient really high in the gantry and they’re really close to the x-ray tube, they’re going to appear much larger than what they actually are. The dose is going to modulate up thinking that the patient is larger than they are and you end up giving the patient more dose than what they would otherwise get. The same can happen if they’re too low. They’re going to appear smaller than what they would normally appear, and the dose is going to be lower than what it should be. 

You want to make sure that you’re getting that patient isocentered as best as you possibly can in the gantry, so that CARE Dose4D can apply the appropriate amount of mAs for the patient.  

Be Aware That There's No Upper Limit

One of the other nuances to recognize with CARE Dose4D is that there’s no upper limit to the amount of mAs that you apply to the patient. The only limit is the power of the x-ray tube itself. With CARE Dose4D, you’re setting a midpoint and then modulating up and down from there. 

Looking at the prescan CTDI is really important because you could end up in a situation where you’re giving the patient a higher dose than what they should get. You should be able to tell by looking at the prescan CTDI if that looks normal for the size of patient. Develop a habit particularly on a Siemens scanner of looking at that prescan CTDI to make sure that your dose isn’t modulating too high or potentially too low as well.

The Siemens guidance documents on CARE Dose4D say that you don’t need to create large patient or obese patient protocols. The reason for this is because the tube current is going to modulate up based on what it’s seeing in the scout and the quality reference mAs. You don’t need to increase the quality reference mAs. You don’t need to create a different protocol for large patients because it should all be taken care of by just using CARE Dose4D the way that it is out of the box.  

CARE Dose4D Configuration Settings

One additional aspect to learn about CARE Dose4D is the configuration settings that dictate how strong or weak the CARE Dose4D is applied to patients. To find this area, go to Options, Configuration and then Examination. Once there, click on the dose card, you’re going to see this screen pop up. 

On this screen you have dose notifications and what the dose alert value should be. This is also where you find the CARE Dose4D configuration. You’ll see there are three columns – child, adult slim and adult obese along with settings for each body part. Oftentimes these will be set to average across the board. Everything can be set to average, but they can be changed to average, weak, strong, or very strong.  

In the above graphic, you can visually see what very strong, strong, average, weak, and very weak looks like for our reference patient as well as for slim and obese patients. The midpoint is for the attenuation of the reference patient. As we get to larger and larger patients, we can see how the strength of CARE Dose4D is applied. In addition, we can also see how the strength of CARE Dose4D is applied to smaller patients.

If we apply a very weak CARE Dose4D setting to our large patients, we can see what the response of the curve is going to be. And in comparison to the other settings, what this illustrates is that the CARE Dose4D modulation will not modulate very aggressively. It’s going to have a little bit more of a muted effect as we get to larger patients.

In contrast, if we apply a very strong strength setting, then as we get to larger and larger patients CARE Dose4D is going to act much more aggressively on those larger patients. This works inversely for slim patients and is where radiology technicians can get into trouble. For example, they may set the strength settings at very strong across the board. This can create problems such as image quality issues for smaller patients.

When you look at the very strong line on the illustration above, it aggressively modulates down for smaller patients. So as the patient gets smaller and smaller, you’ll end up with much lower radiation doses, but also poorer image quality. For this reason, most sites will stick to average for both obese, average and slim patients.

If you’re having issues with image quality or the radiologist wants to see something different in slender patients versus large patients, you can go in and modify the CARE Dose4D strength settings so that the system will behave a differently for those patient populations. 

Review of CARE Dose4D Protocol

To wrap up, there are several key elements to consider when using Siemens CARE Dose4D for your patients.

  1. When using CARE Dose4D, you are using the Quality Reference mAs in conjunction with the topogram to determine how much mAs is going to be applied throughout the patient. This will also determine your image quality and radiation dose, or CDTI, for that specific patient. 
  2. It’s important for staff to understand that that topogram is used by this system to calculate what the mAs should be for the patient.  
  3. Remember that there is no upper limit or upper threshold for CARE Dose4E cutoff except for the limits of the tube itself.  
  4. The Quality Reference mAs is the midpoint for an average sized patient (of 75 kilograms). The tube current is going to modulate up or down based on where that Quality Reference mAs is set.
  5. The strength settings also can affect how aggressively the tube current will modulate throughout the patient.  
 
We hope that this article and video has provided you with awareness of things to consider when using the Siemens CARE Dose4D protocol for your CT patients. If you have questions or comments, please reach out to us at info@olympichp.com and we’d be happy to assist you. 
Review of CARE Dose4D Protocol

Ensuring your equipment is operating properly through an annual CT Physics Evaluation may be the best first step in providing a safe environment for your patients. Our CT Physics Evaluations are designed to be compliant with ACR, TJC, IAC, and State requirements for accreditation and compliance purposes.   You can also always reach out to us if you have questions or want more information on why you should partner with us. 

Contact Us for a No Obligation Quote

253-254-6988